Here's a great video from Close to My Heart Studio J, which shows you different techniques to increase the flexibility of Studio J. It shows how to best use your photos and size them correctly in Studio J. I love how they use to photo wells for one photo. Check it out, it's very clever!
Jayne Martin
Let me show you how to preserve your memories and create beautiful keepsakes, fast and easy!
Friday, September 30, 2011
Tuesday, September 27, 2011
Halloween Cards Using CTMH Spray Pen
I got the idea for this card from Heather Jane Design. I changed it up a bit. I used the Close to My Heart (all products are CTMH) Spray Pen to give the moon some dimension. I used the Color Ready Craft Borders, the August Stamp of the Month - Wicked, Mischief paper packet, Black Brads, and the Art Philosophy Cricut cartridge (for the moon!).


Monday, September 26, 2011
Studio J Basics
Do you or a friend want to learn the step-by-step basics of Close to My Heart Studio J online scrapbooking program? Here's a video from CTMH that will have you scrapping like a pro in no time!
Sunday, September 25, 2011
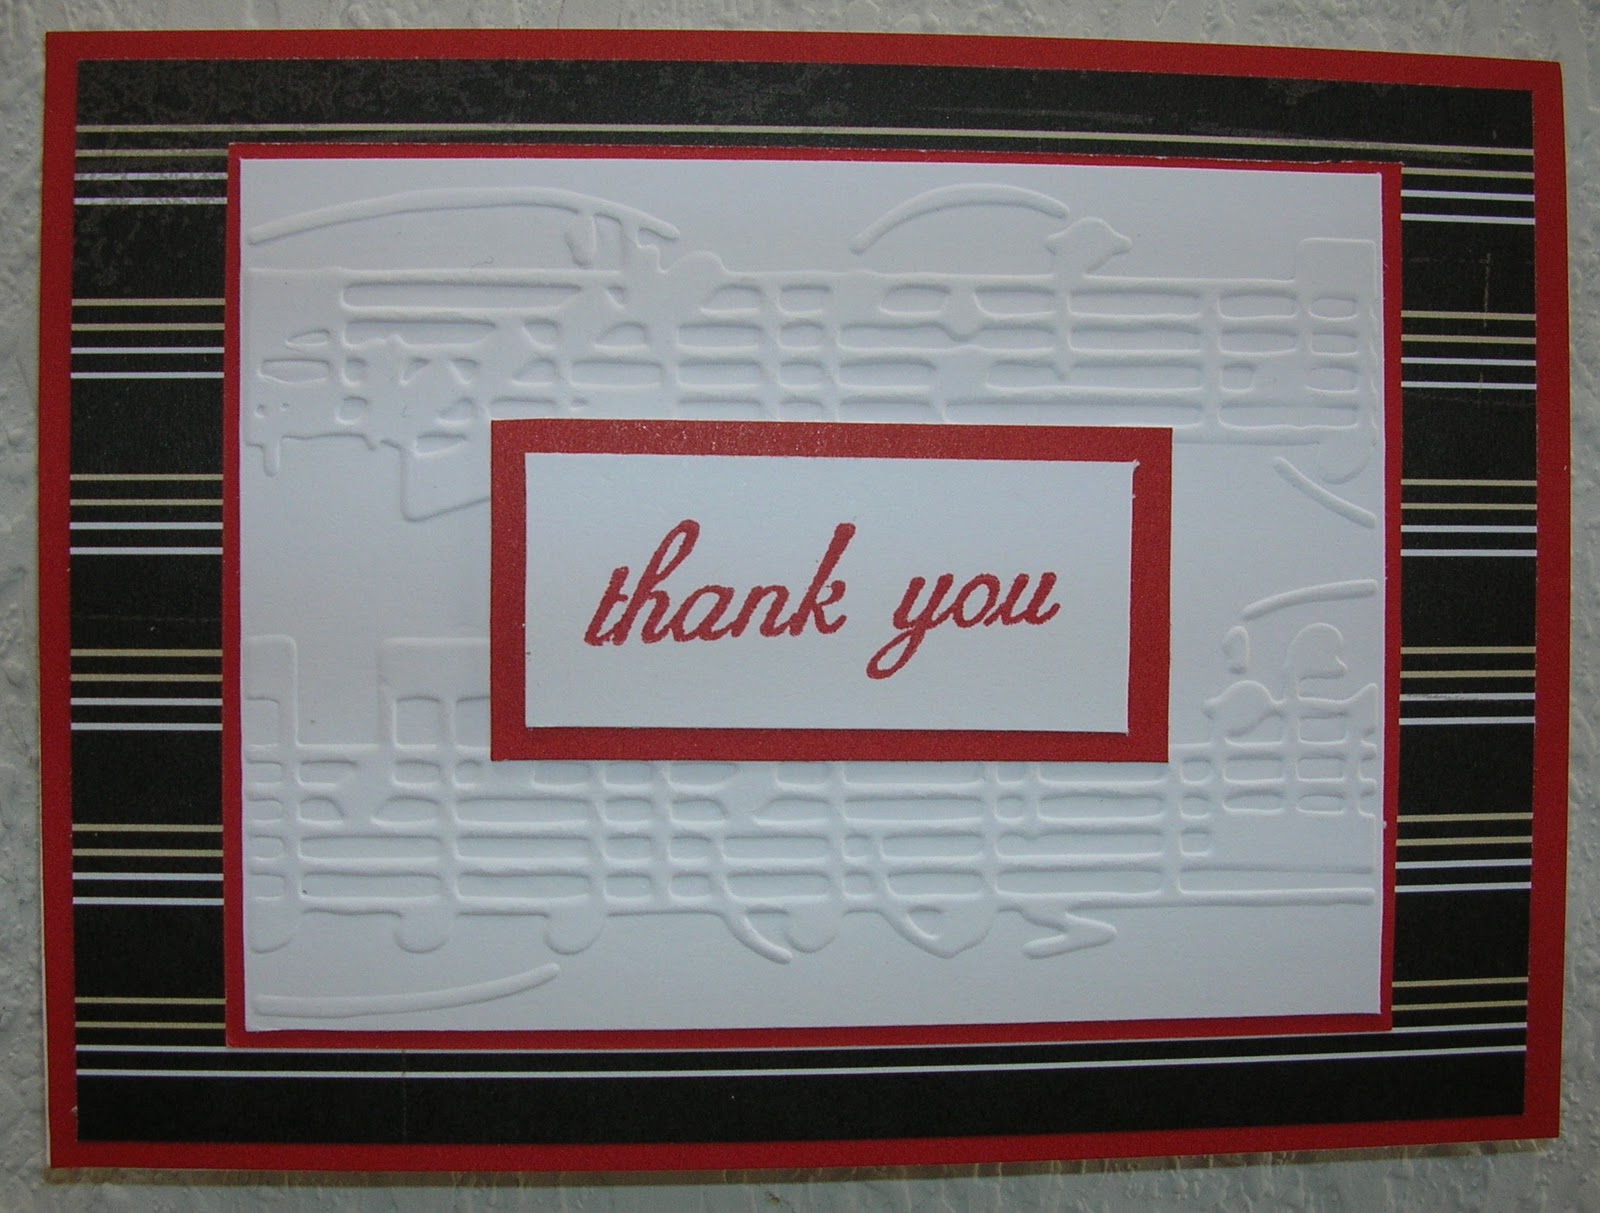
Thank You and Congratulation Cards!
I received an order for Thank You and Congratulation cards. The customer will be using them in her real estate business, so we want a professional and simple. Here'a a few of them.
(All products are Close to My Heart unless stated otherwise.)
This first card uses the Mischief paper packet and the September Stamp of the Month-Limited Edition and Chocolate stamp pad. The Colonial White cardstock is embossed using the Cuttlebug embossing folder, Leafy Branch.

The second card is very simple, using the Cuttlebug Scrollwork embossing folder, For Every Occasion stamp set, Flutter Just Blooms Paper Shapes, and the Bling Assortment for the stick pin.


(All products are Close to My Heart unless stated otherwise.)
This first card uses the Mischief paper packet and the September Stamp of the Month-Limited Edition and Chocolate stamp pad. The Colonial White cardstock is embossed using the Cuttlebug embossing folder, Leafy Branch.


This last one uses Cuttlebug Allegro embossing folder, Silhouette paper packet with Cranberry cardstock and ink, and Life is So Good stamp set.
Saturday, September 24, 2011
Roxie Card
Here's a card I made using the Close to My Heart Roxie paper packet and other CTMH products. I got the idea for the card from Betsy Gully at Paper Boutique. It's a beautiful card. I switched it up just a bit with the sentiment on the other side. I also used the Card Chatter-Sympathy stamp set (D1476), Designer Antiquated Copper Brads and Desert Sand ink pad. The inside of the card says "You are in my prayers."
I almost made this a Christmas card. I think it has that vintage Christmas look. What do you think?

I almost made this a Christmas card. I think it has that vintage Christmas look. What do you think?

Friday, September 23, 2011
Photo Editing with Studio J
I used to think I needed to edit my photos prior to loading them into Studio J. But Studio J provides flexibility for you to edit your photos right in Studio J. You can edit settings, such as brightness and contrast, and many others. This video helps you understand all the editing options available. Close to My Heart provides many videos and tips for using Studio J, so you're never left in the dark!
Thursday, September 22, 2011
September Stamp of the Month
September 2011 Limited Edition
CLOSE TO MY HEART OFFERS BEAUTIFUL STAMPS AT AMAZING DISCOUNTS
Each month you can enjoy a new D-size stamp set, available for one month only, for just $5—that’s over 70% off retail! When you place an order of $50 or more in Close To My Heart products, you qualify for this special Stamp of the Month pricing. If you want, you can purchase it for the retail price of $17.95, but why would you? If you're interested, contact me. But hurry, this offer expires September 30!

Limited Edition, set of 21

Recommended Blocks:
1" × 3 1/2" (Y1002)
2" × 2" (Y1003)
2" × 3 1/2" (Y1009)
Wednesday, September 21, 2011
Close to My Heart Art Philosophy Cricut Cartridge
Have you seen the Close to My Heart Art Philosophy Cricut Cartridge? It's fabulous! I have one and use it all the time! I'll still use my Cuttlebug for embossing, but I use the Philosophy cartridge for making labels for my cards and scrapbook pages. I also love it for the 3 dimensional boxes and shapes. The pillow boxes are fun and they're so easy! They're perfect for the holidays, to make decorations and gifts. The thing I think is the BEST, is that there are stamps that coordinate with the shapes!! This is the added value you get with having a Cricut Cartridge that is designed by the founder of Close to My Heart! If you're interested in the cartridge, contact me!
Monday, September 19, 2011
Studio J Tips
The templates in Studio J are very helpful to get started on your scrapbook layout. But you're not limited to the template design. This video from Close to My Heart shows you many different ways to change the template, by changing the paper colors and designs, adding photo mats, deleting and adding accents and embellishments, and much, much more! Enjoy!
Saturday, September 17, 2011
Back-to-School Scrapbooking Layout Ideas
I've talked about Studio J a lot, and how easy it is to use. But I love the tips from StudioJ.com! They not only help me understand the flexibility in Studio J, they give me great tips on how to make my layouts more interesting. Most of the time the tips are for techniques I hadn't thought of. Here's a tip related to those back to school photos.

Pattern: Snapshot™


Take a peek at this this back-to-school Studio J® layout by Joanne Watchak using the Class Act kit. I love the way she added journaling along each of the two strips of ribbon. To get this look, just click on the Text toolbox and drag two new text areas onto your page, resizing them to fit along the ribbon. Change the background of each text box to "none."
Pattern: Snapshot™
Kit: Class Act
Courtesy of: Joanne Watchak
The middle box on the right page that Joanne filled with journaling was originally a photo well, while the vertical photo to the right of her journaling was originally a text well. If you'd like to change a photo well to a text well or vice versa, click on the well. From the pop-up menu, click on one of these buttons:
Converts a photo well to a text well
Converts a text well to a photo well.
You can switch back and forth as many times as you need until you decide what balance of photos and journaling works best for you. Remember, though, you can only change text wells to photos—new text areas that you drag from the Text toolbox cannot be converted to photos.
Have you taken any back-to-school photos this year? Or maybe you have some photos from yesteryear lurking in the hidden corners of your hard drive. Either way, go into Studio J to preserve your schooltime memories. Once you've created a layout, post it online and leave them a comment with a link to your artwork. They'd love to see what you come up with!
Friday, September 16, 2011
Studio J - Make your own Background and Texture Paper!
Have you ever used My Stickease® to create your very own Background and Texture paper in Studio J? Try it!


Thursday, September 15, 2011
While Supplies Last!
A plethora of discounted and retired Close to My Heart products are available to you at phenomenal prices. Check back often to take advantage of these products that are offered while supplies last at MyCTMH website. There are a few items just in time for Christmas! Happy shopping!
How do you encourage others who feel like they don't have the talent to scrapbook?

www.jeanettelynton.com
Question: If you met someone who didn't feel like they could scrapbook or have the talent to scrapbook, how would you encourage them that they really can? -- submitted by Jan, August 26, 6:01 pm Answer: Truthfully, composition, balance and color coordination have always come very naturally to me. Bu...
Wednesday, September 14, 2011

Tuesday, September 13, 2011
Studio J Video
I've been using Studio J quite a bit lately. The videos available StudioJ.com are very helpful. They give you tips on how to explore the flexibility of Studio J.
I've been using the feature to change the paper styles quite a bit lately. It makes it so much easier to coordinate to your photos. If you haven't tried Studio J, you can at no charge to you, just click here! Access to Studio J
I've been using the feature to change the paper styles quite a bit lately. It makes it so much easier to coordinate to your photos. If you haven't tried Studio J, you can at no charge to you, just click here! Access to Studio J
Monday, September 12, 2011
Studio J Tip
Here's a fun tip from the Studio J facebook site. Use a My Stickease® image (like a heart) as an outline for embellishments (like buttons). Then, delete the My Stickease image, and you'll have a perfect design! I'm going to try it on my next layout.


(Image from Studio J Facebook Site)
Saturday, September 10, 2011
New Close to My Heart Ruler
Have you tried out the new Close to My Heart Ruler? It makes it easy to get evenly spaced stitching on your artwork. I haven't tried it for stitching yet, but I've used it for placing brads evenly. I also like the fact that it is clear. Here's a card from the Close to My Heart facebook site where they used the ruler and the Pair-A-Phrase stamp set. The stamp set is available through September 30th, free, if you purchase $75 or more.


Friday, September 9, 2011
More Studio J Layouts
I placed my order for my September layouts! I'm really breezing through my digital photo backlog. Here's my Christmas 2007 layout, using Close to My Heart Studio J.


Thursday, September 8, 2011
Studio J 2010 Album
I often have just a couple pictures of an event or trip, sometimes not enough to do a full two page layout. For 2010, I thought I'd just put all the 2010 photos in one album. Here are some of the first photos for the year, all using Close to My Heart Studio J.


Wednesday, September 7, 2011
Studio J Layout - Uncle Bud's 80th Birthday
Here's a Studio J Layout, using the Lucky Paper design. It's my Uncle's 80th Birthday party and Breanne's visit in July 2009.


Tuesday, September 6, 2011

Monday, September 5, 2011
Typeset School Layout - Breanne's 2nd Grade
Here's a layout I completed for Breanne's 2nd Grade school pictures. The title may look familiar, I used the cover layout from the Close to My Heart Idea book as my model. I like the layering aspects they used throughout the page.


Supplies used: (All Close to My Heart)
Typeset Level 2 Paper Packet
Typeset Complements Canvas Shapes
Blue Ribbon My Acrylix Stamp Set
Milepost Shapes
Pewter Buttons and Brads
Make It Count Numbers Irrisitables
Notable Alphabet Dimensional Elements
Black Waxy Flax
Cricut Art Philosophy Collection
Subscribe to:
Comments (Atom)